






There is something profoundly satisfying about pulling a hot, puffed round of dough from your oven that you crafted yourself. If you have been searching for a reliable way to make Pita Bread at home, you are in the right place. As we look at the culinary trends of 2026, the resurgence of artisan, homemade pantry staples continues to gain momentum, and mastering this classic flatbread is a milestone for any home cook. Whether you want to achieve that signature pocket for your falafel or a soft, chewy vessel for hummus, this guide will walk you through the process step-by-step.
Also Read: How to Make Reuben Sandwich: Recipe and Instructions
What Exactly is Pita Bread?
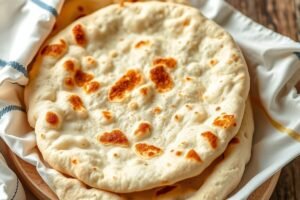
Pita Bread is a leavened, round flatbread originating from the Mediterranean and Middle Eastern regions, characterized by its internal pocket created by high-heat steam. It features a light, airy crumb with a slightly chewy texture and a neutral, toasted flavor profile, making it a versatile foundation for savory fillings, dips, and wraps.
At Savor and Skillet, we find that the appeal of this bread lies in its simplicity. By understanding the interaction between steam and high temperatures, you can easily replicate the professional results seen in commercial bakeries. It is worth the effort not just for the flavor, but for the thrill of watching your dough puff up like a balloon in the heat—an experience that never gets old. For more foundational baking techniques, check out our guide on baking fundamentals to further hone your skills.
Ingredients and Preparation
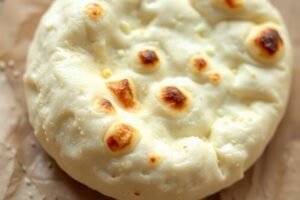
Recipe Overview
- Yields: 8 pita rounds
- Prep Time: 20 minutes (plus 90 minutes rising time)
- Cook Time: 15 minutes
- Total Time: 2 hours 5 minutes
- Difficulty: Intermediate
To produce the best pita bread recipe, quality ingredients and accurate measurements are essential. For the most consistent results in 2026, I highly recommend using a digital kitchen scale rather than volume measurements, as flour density can vary wildly depending on how it is scooped.
- All-Purpose or Bread Flour: 500g (Bread flour provides a chewier structure).
- Warm Water: 325ml (110°F/43°C) to activate the yeast.
- Instant Yeast: 2 teaspoons.
- Olive Oil: 2 tablespoons (adds suppleness to the dough).
- Salt: 1.5 teaspoons.
- Sugar: 1 teaspoon (to feed the yeast).
You will need a heavy-duty stand mixer or a large mixing bowl for hand-kneading, a rolling pin, and either a preheated baking stone or a heavy cast-iron skillet. Ensure your oven is calibrated correctly, as high-heat baking requires precision to avoid burning the exterior before the steam creates the interior pocket.
How to Make Pita Bread
Now that you have gathered your ingredients, it is time to move on to the actual labor: how to make pita bread from scratch. This process requires patience, particularly during the proofing stages, as the gluten structure needs time to relax to allow for even expansion.
- Activation: Combine the warm water, sugar, and yeast in a small bowl. Let it sit for 5-10 minutes until it becomes foamy. If it does not foam, the yeast may be expired, and you should start over to ensure a proper rise.
- Mixing: In a large bowl or stand mixer, combine the flour and salt. Add the yeast mixture and olive oil. Mix until a shaggy dough forms.
- Kneading: Knead the dough for 8-10 minutes on a lightly floured surface. You are looking for a smooth, elastic consistency that springs back when poked.
- First Proof: Place the dough in a greased bowl, cover with a damp cloth, and let it rise in a warm, draft-free spot for 60-90 minutes, or until it has doubled in size.
- Dividing: Punch the dough down gently to release air. Divide it into 8 equal portions and roll each into a tight ball. Cover with a cloth and let them rest for 15 minutes to allow the gluten to relax, which makes rolling significantly easier.
- Rolling: Roll each ball into a 6-inch circle about 1/8-inch thick. Keep them uniform in thickness; if the dough is too thick, it will be doughy, and if it is too thin, it may not puff.
- Cooking: Preheat your oven to 475°F (245°C) with your baking stone or cast-iron skillet inside. Place two rounds at a time on the hot surface. Bake for 3-4 minutes. You will see the bread puff up dramatically—this is the steam trapped inside.
- Cooling: Remove the pita from the oven and transfer immediately to a clean kitchen towel. Cover them while they cool to maintain their softness.
Warm, soft, and chewy, this yeast bread rises beautifully to form a natural pocket in the center—perfect for filling with savory meats, fresh vegetables, or your favorite sauces. Pita bread is a Mediterranean classic that delights the palate while providing a solid energy boost to round out your daily meals. I’m sharing this versatile homemade recipe here on *Savor and Skillet* so you can enjoy the experience of fresh, fragrant, and tender bread cooked right in your own pan or oven.
To ensure the dough rises perfectly—creating a sturdy, hollow pocket while maintaining a soft, pliable texture—check out the secrets to making it in the video tutorial I’ve included below:
Mastering Pita Bread Tips for Success
After detailing the technical steps for how to make pita bread, let’s discuss how to ensure your results are consistent every time. One of the most common pitfalls is inconsistent heat, so understanding the nuances of your equipment is vital.
In my experience, the secret to the perfect pocket is high, even heat. If your oven is not hot enough, the water inside the dough will evaporate slowly, resulting in a flat bread rather than a pocketed pita. If you notice your bread is coming out brittle, you might be over-baking. Aim for a light golden hue rather than a deep brown. For those interested in the science of heat transfer, Serious Eats provides an excellent breakdown of how conductive heat works on baking stones, which applies perfectly to flatbreads as well.
Always ensure your rolling thickness is consistent across the entire disc. If the center is significantly thicker than the edges, the edges will burn before the middle has a chance to fully expand. If the dough snaps back while you are trying to roll it, cover it and let it rest for another ten minutes; the gluten simply needs to relax further.
Variations and Pairing Ideas
Since you now understand the essential techniques for baking the bread itself, let’s explore how to customize your pita bread and integrate it into your meals. The beauty of this recipe is its adaptability to different flavor profiles.
You can easily elevate the dough by brushing the finished rounds with a mixture of melted butter, minced garlic, and fresh parsley immediately after they come out of the oven. For a heartier version, try incorporating a tablespoon of za’atar into the flour mix before adding your wet ingredients. When it comes to serving, remember that fresh pita is best enjoyed warm. It acts as the perfect companion to classic dips like creamy hummus or roasted eggplant baba ganoush. If you are preparing a Mediterranean-inspired spread, consider pairing your pita with grilled meats, fresh cucumber-tomato salad, and a dollop of tzatziki for a balanced, vibrant dinner.
Frequently Asked Questions About Pita Bread
Why did my pita bread not puff up?
The most likely reason for a lack of puff is insufficient heat or the dough being too thin in spots, allowing steam to escape. Ensure your oven is fully preheated to 475°F and your baking surface is hot before adding the dough.
Can I make pita bread ahead of time?
Yes, you can bake pita bread in advance and store it for later use. Once cooled, keep them in an airtight container at room temperature for up to two days, or freeze them for up to three months.
How do I reheat pita bread to make it soft again?
To restore the soft, pliable texture, wrap the pita in a damp paper towel and microwave it for 15-20 seconds. Alternatively, you can wrap them in foil and warm them in a 350°F oven for 5 minutes.
Can I use whole wheat flour for this recipe?
You can use whole wheat flour, but it is best to start with a 50/50 blend of all-purpose and whole wheat flour. Whole wheat flour contains bran that can cut through the gluten strands, potentially making the bread denser and less likely to puff perfectly.
Do I need a special baking stone?
While a baking stone or steel provides the most consistent heat, a heavy cast-iron skillet placed on the center rack of your oven works exceptionally well. Just ensure the skillet is thoroughly preheated before you drop the dough onto it.
Conclusion
We just unpacked the nuances of creating perfect pita bread — from dough preparation to the high-heat techniques required for that iconic pocket. I hope this guide empowers you to stop relying on store-bought versions and start enjoying the unmatched aroma of fresh bread in your own kitchen. As we move through 2026, finding joy in these foundational culinary tasks is what makes home cooking truly special. Try this recipe this weekend and see how much better your next Mediterranean meal tastes with bread you made yourself! If you enjoyed this guide, be sure to explore more of our baking archives on Savor and Skillet for further inspiration.

Other Articles

Tiropita Recipe: How to Make It Step by Step
White Chicken Chili Recipe: How to Make It

No Comment! Be the first one.