






There’s something uniquely comforting and utterly satisfying about perfectly executed Buttermilk Fried Chicken. The golden-brown crust, the tender, juicy meat infused with a subtle tang from the buttermilk marinade – it’s a culinary masterpiece that evokes warmth and nostalgia. This isn’t just a recipe; it’s a guide to achieving that ideal crispness and flavor that makes every bite memorable. In 2026, as home cooks continue to seek classic comfort food with restaurant-quality results, mastering this dish remains a top priority. Whether you’re hosting a family dinner or simply craving a taste of Southern hospitality, this step-by-step approach from Savor and Skillet will empower you to create a truly exceptional meal.
Also Read: Buttermilk Pancakes Recipe: How to Make It
What is Buttermilk Fried Chicken?
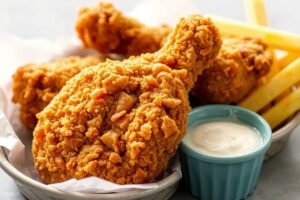
Buttermilk Fried Chicken is a classic preparation where chicken pieces are marinated in buttermilk, which tenderizes the meat and adds a distinct tangy flavor, before being dredged in seasoned flour and deep-fried to a crispy, golden-brown perfection. The magic of buttermilk lies in its mild acidity, which breaks down tough muscle fibers without making the chicken chewy, resulting in an incredibly moist interior. This technique yields a crust that’s not just crunchy but also deeply flavorful, making it a beloved comfort food across many cultures.
Ingredients for the Best Buttermilk Fried Chicken
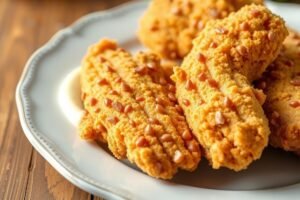
Now that we understand the essential appeal of Buttermilk Fried Chicken, let’s gather everything you’ll need to create this culinary delight. The right ingredients are the foundation of any great dish, and for fried chicken, quality matters, from your chicken to your choice of spices and frying oil.
Buttermilk Fried Chicken Recipe Card
- Yields: 8 servings
- Prep Time: 25 minutes (plus 4-24 hours marinating)
- Cook Time: 25-30 minutes
- Total Time: 50-55 minutes (plus marinating)
- Difficulty: Medium
Ingredients:
- 3-4 pounds bone-in, skin-on chicken pieces (a mix of drumsticks, thighs, and breasts works well)
- 4 cups (1 liter) buttermilk
- 2 tablespoons hot sauce (e.g., Tabasco or Frank’s RedHot, optional but recommended)
- 1 tablespoon salt, divided
- 1 teaspoon black pepper, divided
- 3 cups all-purpose flour
- 1/4 cup cornstarch (for extra crispness)
- 1 tablespoon paprika
- 1 tablespoon garlic powder
- 1 tablespoon onion powder
- 1 teaspoon cayenne pepper (adjust to taste for heat)
- 1 teaspoon dried thyme
- 1/2 teaspoon baking powder (a common chef’s trick for a lighter crust)
- 4-6 cups peanut oil, vegetable oil, or shortening, for frying
Essential Equipment:
- Large non-reactive bowl for marinating
- Large shallow dish or bowl for breading
- Heavy-bottomed pot or Lodge cast iron skillet (10-12 inch) for frying
- Wire rack with a baking sheet for draining
- Instant-read meat thermometer
- Tongs
Ingredient Notes and Substitutions:
- Chicken: Bone-in, skin-on chicken pieces are crucial for flavor and moisture. Boneless chicken cooks much faster and can dry out easily. If using breasts, consider cutting them in half horizontally to reduce cooking time and ensure even doneness.
- Buttermilk: Full-fat buttermilk is preferred for its tenderizing properties and rich flavor. If you don’t have buttermilk, you can make a substitute by adding 1 tablespoon of white vinegar or lemon juice to 1 cup of whole milk and letting it sit for 5-10 minutes until it slightly curdles. Adjust quantities as needed.
- Hot Sauce: The hot sauce adds a subtle depth of flavor, not necessarily heat, and helps tenderize the chicken. Feel free to adjust or omit based on preference.
- Frying Oil: Peanut oil is excellent for frying due to its high smoke point and neutral flavor. Vegetable oil or shortening are also good alternatives. Avoid olive oil, as its smoke point is too low for deep-frying.
- Seasoning: The spice blend is highly customizable. Feel free to adjust the ratios or add other favorites like dried oregano, white pepper, or a pinch of ground ginger for a unique twist.
How to Make Buttermilk Fried Chicken Step by Step
With our ingredients prepped and ready, it’s time to dive into the heart of the cooking process. Since you now understand the importance of quality ingredients, here’s how to transform them into crispy, juicy Buttermilk Fried Chicken, step by step, ensuring every stage contributes to an unforgettable result.
- Prepare the Chicken:
- Rinse the chicken pieces under cold water and pat them thoroughly dry with paper towels. Removing excess moisture helps the marinade adhere better and contributes to a crispier skin.
- In a large non-reactive bowl, combine the buttermilk, hot sauce (if using), 1 tablespoon of salt, and 1 teaspoon of black pepper. Whisk to combine.
- Add the chicken pieces to the buttermilk mixture, ensuring they are fully submerged. Cover the bowl and refrigerate for at least 4 hours, or preferably overnight (up to 24 hours). This marinating step is key to tenderizing the chicken and infusing it with flavor.
- Prepare the Breading Station:
- About 30-45 minutes before frying, remove the chicken from the refrigerator to allow it to come closer to room temperature, which promotes more even cooking.
- In a large shallow dish or bowl, whisk together the all-purpose flour, cornstarch, paprika, garlic powder, onion powder, cayenne pepper, dried thyme, baking powder, and the remaining 1 tablespoon of salt and 1 teaspoon of black pepper. Ensure all ingredients are well combined.
- Dredge the Chicken:
- Working with one piece of chicken at a time, remove it from the buttermilk marinade, allowing any excess to drip off.
- Place the chicken piece into the seasoned flour mixture. Dredge generously, pressing the flour onto all surfaces of the chicken to create a thick, even coating.
- Shake off any excess flour, then place the breaded chicken on a clean wire rack set over a baking sheet. Repeat with the remaining chicken pieces. This resting period on the rack (about 15-20 minutes) allows the flour coating to adhere more firmly, reducing the chances of it falling off during frying.
- Heat the Frying Oil:
- Pour your chosen frying oil into a heavy-bottomed pot or large cast-iron skillet, ensuring it’s at least 2-3 inches deep.
- Heat the oil over medium-high heat until it reaches a temperature of 325-350°F (160-175°C). Use an instant-read thermometer to monitor the temperature accurately. Maintaining the correct oil temperature is critical for crispy, evenly cooked chicken.
- Fry the Chicken:
- Carefully place 3-4 pieces of breaded chicken into the hot oil, ensuring not to overcrowd the pot. Overcrowding will lower the oil temperature significantly, resulting in greasy, soggy chicken.
- Fry for about 6-8 minutes per side, turning occasionally with tongs, until the chicken is golden brown and cooked through. The total cooking time will vary depending on the size and type of chicken piece (drumsticks and thighs typically take 8-10 minutes per side, breasts 6-8 minutes per side).
- Use your instant-read thermometer to check the internal temperature. Chicken is safely cooked when it reaches an internal temperature of 165°F (74°C) in the thickest part of the meat, without touching the bone.
- Once cooked, carefully remove the chicken from the oil and place it on a clean wire rack set over a baking sheet to drain excess oil. This allows air to circulate, keeping the chicken crispy.
- Repeat with the remaining chicken pieces, allowing the oil to come back up to temperature between batches.
- Rest and Serve:
- Allow the fried chicken to rest on the wire rack for 5-10 minutes before serving. This allows the juices to redistribute, ensuring maximum tenderness and flavor.
- Serve hot with your favorite sides!
Who doesn’t love crispy fried chicken? Honestly, even I love snacking on it while watching my favorite movies or anime, or even while editing articles for the website. If you want to cook delicious Buttermilk Fried Chicken that rivals what you’d buy from the pros, definitely check out the video below:
Mastering the Fry: Essential Tips for Crispy Buttermilk Fried Chicken
After meticulously following the step-by-step instructions, the goal is always that perfectly crispy, juicy chicken. Since you now know how to bread and fry, let’s explore some nuanced techniques and common chef’s secrets to truly master the frying process and achieve consistently spectacular results with your Buttermilk Fried Chicken.
- Maintain Oil Temperature: This is arguably the most critical factor. Too low, and the chicken absorbs too much oil, becoming greasy. Too high, and the exterior burns before the interior cooks through. Aim for a consistent 325-350°F (160-175°C). A reliable ThermoWorks instant-read thermometer is your best friend here. Adjust the heat as needed and don’t rush the process between batches.
- Don’t Overcrowd the Pot: Resist the urge to fry too many pieces at once. Overcrowding dramatically drops the oil temperature and leads to steaming instead of frying, resulting in a soggy crust. Fry in batches, leaving plenty of space between pieces.
- Rest the Battered Chicken: As mentioned in the recipe, letting the breaded chicken rest on a wire rack for 15-20 minutes before frying helps the flour coating adhere better. This simple step prevents the breading from sloughing off in the hot oil.
- Double Dredging (Optional for Extra Crispness): For an ultra-crispy crust, some chefs advocate for a double dredge. After the first flour coating, dip the chicken back into the remaining buttermilk (or a separate bowl of buttermilk if you prefer to keep it clean), then dredge it a second time in the seasoned flour. This creates a thicker, craggier crust.
- Use a Wire Rack for Draining: Never place freshly fried chicken directly on paper towels. While paper towels absorb oil, they also trap steam, which can make the crust soggy. A wire rack allows air to circulate around the chicken, keeping it crisp.
- Season Liberally: Don’t be shy with the seasoning in your flour mixture. Fried chicken relies heavily on the crust for flavor, so a well-seasoned dredge is essential.
- Ventilation is Key: Frying chicken produces a lot of steam and oil splatter. Ensure good ventilation in your kitchen, perhaps by turning on your range hood or opening a window.
Common Mistakes and How to Fix Them
Even with the best intentions and carefully selected ingredients, making Buttermilk Fried Chicken can sometimes present challenges. Building on our frying tips, let’s address some of the most common pitfalls home cooks encounter and provide practical solutions to ensure your chicken turns out perfectly every time.
- Soggy or Greasy Chicken:
- Mistake: Oil temperature is too low, or the pot is overcrowded.
- Fix: Always use a thermometer to maintain the oil temperature between 325-350°F (160-175°C). Fry in small batches to prevent the oil temperature from dropping too much. Ensure chicken is thoroughly drained on a wire rack, not on paper towels.
- Burnt Exterior, Raw Interior:
- Mistake: Oil temperature is too high.
- Fix: Reduce the heat to maintain the correct temperature range. If the chicken is browning too quickly, you may need to lower the heat and cook it for longer at a slightly lower temperature to allow the interior to catch up. Don’t be afraid to take the chicken out briefly, let the oil cool slightly, then return it.
- Breading Falls Off:
- Mistake: Chicken wasn’t patted dry enough before marinating/breading, or the breaded chicken wasn’t allowed to rest.
- Fix: Ensure chicken is very dry before marinating. After dredging, let the breaded chicken rest on a wire rack for at least 15-20 minutes. This allows the moisture from the chicken to hydrate the flour, creating a “glue” that adheres better to the surface.
- Chicken is Dry:
- Mistake: Overcooked chicken or inconsistent heat during frying.
- Fix: Use an instant-read thermometer to ensure chicken reaches 165°F (74°C) and no higher. Remove it from the oil as soon as it hits that temperature. Bone-in, skin-on pieces are naturally more forgiving and less prone to drying out than boneless cuts.
- Lack of Flavor:
- Mistake: Insufficient marinating time or under-seasoned flour.
- Fix: Marinate chicken for at least 4 hours, ideally overnight. Be generous with the seasonings in your flour mixture; the crust carries much of the flavor. Taste your flour mixture before adding chicken (a tiny pinch, not a full spoonful) to ensure it’s well-seasoned.
Serving, Storage, and Reheating Your Fried Chicken
Now that you’ve navigated the potential pitfalls and mastered the art of frying, the next crucial steps involve enjoying your perfectly cooked chicken, knowing how to store any leftovers, and effectively reheating them. After covering common mistakes, let’s make sure you get the most out of your delicious Buttermilk Fried Chicken.
Serving Suggestions:
Buttermilk fried chicken is a versatile dish that pairs wonderfully with a variety of sides. Classic accompaniments include creamy mashed potatoes, tangy coleslaw, sweet corn on the cob, fluffy biscuits, or a fresh green salad. For a full Southern-inspired meal, consider adding macaroni and cheese or collard greens. A drizzle of hot honey over the chicken can also add an exciting sweet and spicy kick!
Storage:
Allow any leftover fried chicken to cool completely at room temperature (no more than 2 hours) before storing. Place the cooled chicken in an airtight container or wrap individual pieces tightly in aluminum foil or plastic wrap. Store in the refrigerator for up to 3-4 days. For longer storage, fried chicken can be frozen for up to 3 months. To freeze, place cooled pieces on a baking sheet and freeze until solid, then transfer to a freezer-safe bag or container.
Reheating:
Reheating fried chicken without losing its crispness can be a challenge, but it’s certainly achievable:
- Oven (Recommended for Crispness): Preheat your oven to 400°F (200°C). Place the chicken pieces on a wire rack set over a baking sheet (this helps air circulate and keeps the bottom crispy). Reheat for 15-20 minutes, or until thoroughly heated through and the skin is crispy again.
- Air Fryer: Preheat your air fryer to 350°F (175°C). Place chicken pieces in a single layer in the air fryer basket. Cook for 8-12 minutes, flipping halfway through, until hot and crispy. This is a very effective method for restoring crispness.
- Skillet: Heat a small amount of oil in a skillet over medium heat. Add chicken pieces and cook for 3-5 minutes per side, until hot and crispy. This method is best for 1-2 pieces.
- Microwave (Not Recommended for Crispness): While convenient, the microwave will make the chicken soft and potentially soggy. Only use this method if crispness is not a priority. Heat in 30-second intervals until warmed through.
Frequently Asked Questions About Buttermilk Fried Chicken
As we wrap up our comprehensive guide to creating the perfect Buttermilk Fried Chicken, it’s natural to have lingering questions about specific aspects of the recipe or preparation. With all the details on serving and storage now clear, let’s address some common queries that often arise, ensuring you feel confident and prepared for success in your kitchen.
Why is buttermilk used for fried chicken?
Buttermilk is used because its mild acidity naturally tenderizes the chicken meat without making it tough, while also infusing it with a subtle tangy flavor. The lactic acid in buttermilk helps to break down muscle fibers and proteins, resulting in incredibly moist and flavorful chicken after frying.
Can I make buttermilk fried chicken with boneless, skinless chicken?
Yes, you can use boneless, skinless chicken, but adjust cooking times significantly as it will cook much faster. Be mindful that boneless chicken is more prone to drying out, so careful monitoring of internal temperature (165°F/74°C) is crucial to maintain moisture.
What’s the best oil to use for frying chicken?
The best oils for frying chicken are those with a high smoke point and a neutral flavor, such as peanut oil, vegetable oil, canola oil, or shortening. These oils can withstand the high temperatures required for deep-frying without breaking down or imparting undesirable flavors to your chicken.
How can I make my fried chicken extra crispy?
To achieve extra crispy fried chicken, ensure your oil is at the correct temperature (325-350°F / 160-175°C), don’t overcrowd the pot, and consider adding a small amount of cornstarch or baking powder to your flour dredge. Allowing the breaded chicken to rest for 15-20 minutes before frying also helps the coating adhere firmly.
Can I prepare the chicken ahead of time?
Yes, you can prepare the chicken ahead by marinating it in buttermilk for up to 24 hours in the refrigerator. You can also dredge the chicken in flour up to 30 minutes before frying, allowing it to rest on a wire rack. However, for the freshest taste and best texture, frying just before serving is recommended.
From understanding the role of buttermilk to mastering the frying technique and troubleshooting common issues, you’re now equipped with the knowledge to make truly exceptional Buttermilk Fried Chicken. Having explored everything from proper storage to reheating strategies, it’s clear that a little attention to detail goes a long way. Mirdania believes that creating such a beloved dish in your own kitchen is one of the most rewarding culinary experiences. We invite you to try this recipe from Savor and Skillet soon – you’ll be amazed at the flavorful, crispy results that stand up to any restaurant’s offering. Here’s to making delicious memories and elevating your home cooking in 2026!

Other Articles

Chicken and Dumplings Recipe: How to Make It
How to Make Biscuits: Recipe and Instructions

No Comment! Be the first one.