






There are few experiences in the culinary world more satisfying than the shatteringly crisp, buttery layers of phyllo dough giving way to a warm, tangy, and molten cheese filling. If you have been searching for a reliable Tiropita recipe to recreate that authentic Greek bakery experience at home in 2026, you have come to the right place. At Savor and Skillet, we believe that mastering this classic pie is a rite of passage for any home baker, offering a perfect balance of texture and savory depth. Whether you are hosting a brunch or looking for a comforting weeknight side, this guide will walk you through everything you need to know to achieve golden perfection.
Also Read: New York Deli Pastrami Sandwich Recipe: How to Make It Step by Step
What is Tiropita?

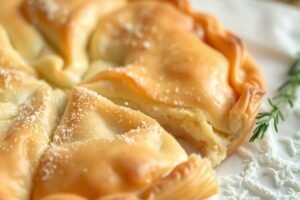
Tiropita is a traditional Greek cheese pie made from layers of flaky, buttered phyllo dough wrapped around a savory filling of feta cheese, eggs, and sometimes Greek yogurt or ricotta. It delivers a signature contrast between the ultra-thin, crunchy exterior and a soft, creamy, and salty center, making it a beloved staple of Mediterranean comfort food.
Understanding the architecture of this dish is crucial for success. Unlike a standard tart, Tiropita relies on the structural integrity of the phyllo dough, which requires delicate handling and generous amounts of clarified butter or high-quality olive oil. In my experience, the magic of a great Tiropita lies not just in the quality of the feta—which should ideally be authentic Greek feta preserved in brine—but in how the steam interacts with the layers during the baking process. By 2026, many home cooks have realized that the “best” Tiropita recipe is one that prioritizes the moisture content of the filling to ensure the inside remains tender while the crust turns a deep, mahogany gold.
Ingredients and Preparation
Since you now understand the essential flavor profile and structural needs of a classic Tiropita, let’s look at the specific components required to build your own. Having your mise en place ready is the key to preventing the phyllo from drying out while you work.
Recipe Card: Classic Tiropita
- Yields: 8-10 servings
- Prep Time: 30 minutes
- Cook Time: 45 minutes
- Total Time: 1 hour 15 minutes
- Difficulty: Intermediate
Ingredients:
- 1 lb (450g) Phyllo dough, thawed overnight in the refrigerator
- 12 oz (350g) High-quality Greek Feta cheese, crumbled
- 8 oz (225g) Ricotta or Anthotyro cheese
- 3 Large eggs, lightly beaten
- 1/2 cup Greek yogurt (full fat)
- 1/2 cup Unsalted butter, melted (plus more for brushing)
- 1/4 cup Fresh parsley, finely chopped
- 1/4 tsp Ground nutmeg (optional, adds depth)
- Black pepper to taste
When selecting your ingredients, prioritize authentic Greek feta. According to industry standards for 2026, authentic feta is a protected designation of origin (PDO) product, and its sharpness is often unmatched by domestic alternatives. The addition of Greek yogurt is a Savor and Skillet secret; it provides a necessary tang that cuts through the richness of the butter and feta, keeping the filling luscious rather than dry. If you find the phyllo intimidating, remember that it is merely paper-thin wheat dough—if it tears, simply patch it with another piece; once baked, no one will notice.
How to Make Tiropita
With your ingredients prepped and your workspace clear, it is time to move on to the actual assembly—the process of layering the phyllo and creating the filling. This is the stage where the structural integrity of the Tiropita is formed, so follow these steps carefully to ensure a flaky final result.
Step 1: Prepare the filling. In a medium mixing bowl, combine the crumbled feta, ricotta, eggs, Greek yogurt, chopped parsley, nutmeg, and a generous crack of black pepper. Mix until the ingredients are well-incorporated but still slightly chunky. The cheese should hold together but not become a fine paste; texture is important here.
Step 2: Prepare the pan and butter. Preheat your oven to 375°F (190°C). Melt your butter in a small saucepan or microwave-safe bowl. Brush the bottom and sides of a 9×13 inch baking dish thoroughly with melted butter. This prevents the bottom layer of phyllo from sticking and ensures it crisps up rather than soaking up moisture.
Step 3: Layering the phyllo. Lay out your phyllo sheets. Take one sheet and place it in the bottom of the dish, allowing the edges to overhang slightly. Brush it lightly with melted butter. Repeat this process with 7 or 8 sheets of phyllo, brushing each individual sheet with butter as you go. This meticulous layering is what creates the iconic crunch.
Step 4: Adding the filling. Spread your cheese mixture evenly over the bottom layer of phyllo. Do not press it down too hard; keep it airy. Fold the overhanging edges of the phyllo over the top of the filling to create a seal.
Step 5: Finishing the top. Layer the remaining sheets of phyllo on top, brushing each one with butter. Once finished, use a sharp knife to score the top layers into squares or diamonds. Scoring allows steam to escape during the baking process and makes serving much cleaner later. Brush the very top layer with any remaining butter.
Step 6: Baking. Place the dish in the center rack of the oven. Bake for 40 to 45 minutes, or until the top is a deep golden brown and the filling is set. You will know it is done when the crust feels crisp to the touch and the edges are slightly pulling away from the pan.
Layers of crisp, flaky phyllo dough brushed with savory butter encase a rich, creamy, and savory Feta cheese filling—Tiropita is a classic Greek pastry that delights the palate while providing a satisfying energy boost for your downtime. I’m sharing this favorite Mediterranean-style cheese pie recipe here at Savor and Skillet so you can enjoy the sensation of crispy pastry paired with savory, melting cheese—straight from your own oven.
To ensure the phyllo crust puffs up into a golden, crispy finish without crumbling, and that the cheese filling is perfectly savory and creamy, check out the secrets to making it in the video tutorial I’ve included below:
Chef Techniques and Common Mistakes
After successfully navigating the assembly process in the previous section, it is worth discussing some common pitfalls that even experienced cooks encounter. Mastering these techniques will elevate your Tiropita from “homemade” to bakery-quality.
The most frequent error is allowing the phyllo to dry out during assembly. Phyllo dough is incredibly thin and begins to dry the moment it hits the air. Keep a slightly damp—not soaking—kitchen towel over your stack of sheets while you work. Another common issue is a “soggy bottom.” This often happens if the filling is too wet or if the oven isn’t hot enough. Always ensure your oven is fully preheated before putting the pie inside; for more technical tips on pastry, you can browse our baking basics guide.
Additionally, do not rush the cooling process. Letting the pie rest for at least 15 to 20 minutes after taking it out of the oven is vital. This resting time allows the cheeses to set and the steam to redistribute, resulting in layers that remain crisp rather than turning soft upon contact with the warm cheese filling. If you find the top is browning too quickly but the center isn’t yet firm, feel free to loosely tent the top with aluminum foil for the final 10 minutes of baking.
Serving and Storage
Since you now have the technique down for a perfectly crisp pie, let’s talk about how to serve and store it properly. Tiropita is versatile enough to be served at various temperatures, though the serving method can change the sensory experience.
For the best experience, serve the Tiropita warm, cut along the lines you scored before baking. It pairs beautifully with a crisp cucumber and tomato salad, or a side of tzatziki for added freshness. If you have leftovers, allow them to cool completely before transferring them to an airtight container. Refrigeration will soften the pastry, so to revive that signature crunch, I always recommend reheating in a 350°F (175°C) oven for about 10 minutes rather than using a microwave. Microwaving will essentially steam the phyllo, destroying the flaky texture you worked so hard to achieve.
You can also freeze unbaked Tiropita for up to one month. Simply assemble the pie, wrap it tightly in multiple layers of plastic wrap and foil, and freeze it. When ready to bake, increase the baking time by about 10-15 minutes and bake directly from frozen. This makes it an excellent “emergency” meal to have on hand for unexpected guests.
Frequently Asked Questions About Tiropita
After covering the technical aspects of assembly and storage, the obvious next question is: what are some of the most common concerns regarding the ingredients and process? Here is everything you need to know to troubleshoot your way to the best result.
Can I use puff pastry instead of phyllo?
While you can use puff pastry, it will result in a much heavier, denser pie that lacks the authentic crunch of traditional Tiropita. Stick with phyllo dough for the classic texture, as its thinness allows the savory cheese filling to shine without being overwhelmed by buttery, laminated dough.
Why did my phyllo sheets break when I unrolled them?
Phyllo dough is extremely delicate and often cracks if it is too cold or if the humidity in your kitchen is very low. Always thaw your phyllo in the refrigerator overnight, then let it sit at room temperature for 30 minutes before opening the package; if it tears, don’t worry, just overlap the pieces.
Can I make Tiropita ahead of time?
Yes, Tiropita is an excellent make-ahead dish that actually benefits from the flavors melding over a few hours. You can prepare the entire assembly up to 24 hours in advance and keep it covered in the refrigerator, then bake it fresh when you are ready to serve.
What is the best cheese ratio for the filling?
A 2:1 ratio of feta to a softer cheese like ricotta or Greek yogurt provides the perfect balance of saltiness and creaminess. Pure feta can be quite intense and grainy when baked alone, so the addition of a secondary, milder cheese ensures a smooth, luscious filling texture.
How do I know when the Tiropita is fully baked?
Your Tiropita is finished when the top layers are a deep golden brown and the center of the pie feels firm when gently pressed with a spatula. The edges should show a slight, crisp lift from the sides of the pan, and the aroma should be noticeably buttery and savory.
Conclusion
We just unpacked the essential steps for crafting a perfect, bakery-style dish — now here is where it gets really interesting: once you master this basic recipe, you can experiment with variations like adding caramelized onions, fresh dill, or even a hint of lemon zest to the cheese mixture. Whether you are a novice or a seasoned baker, the secret remains the same: treat your ingredients with care, respect the layering process, and always, always allow for that crucial resting period before serving.
Cooking at home should be an empowering experience, and I hope this guide gives you the confidence to bring a piece of Greece into your kitchen. Try this recipe this weekend, and you will understand immediately why this simple cheese pie has remained a favorite through 2026 and beyond. If you enjoyed this guide, leave us a comment and let us know how your crispy, golden pie turned out—we love hearing about your kitchen triumphs!


Baklava Recipe: How to Make It
How to Make Pita Bread: Recipe and Instructions

No Comment! Be the first one.